




Aquarium lighting
December 19, 2008
Lighting is one of the foundations of successful aquaristics. Even aquariums without plants cannot do without it, let alone those with plants. Without suitable lighting you cannot grow aquarium plants. Lighting can be provided in many ways, but at our latitudes artificial lighting is the only option. You need to choose a sufficient lighting output. Makeshift lighting usually does not have it, but there is also no need to overdo the output if you are not keeping planted aquariums. The lights need to be on for at least 10 (8) hours a day. During the summer, especially with aquariums by windows, it is then a good idea to reduce the lighting dose.
The lighting I describe is in no way dependent on the aquarium, it is not attached to the cover glass, and it is lightweight.
Materials:
- aluminum or galvanized sheet metal
- plastic for the end panels, at least 5 mm thick
- fluorescent tube(s)
- ballast(s)
- starter(s)
- switch(es)
- plug
- cable and wires
- screws and nuts, e.g. M3
- assorted small bits
- tools, of course
The size of the lighting should be chosen according to the size of the fluorescent tubes and should be a little smaller than the aquarium so that it does not fall off.
After the final design of the lighting dimensions, we first make the end panels from plastic. The front and rear bevel is not just aesthetic; above all it makes the lighting easier to handle in tight spaces.
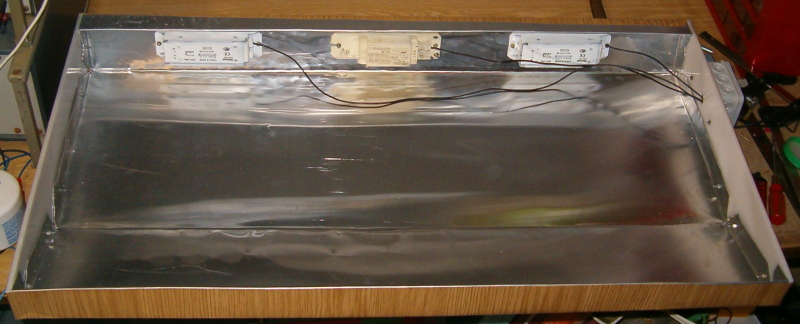
The aluminum/galvanized sheet metal reflects light back into the aquarium, is lightweight, and shaping it gives the hood its rigidity. We cut out a rectangle of sheet metal with a sufficient overlap on the front sides (that part is bent inward) and on the sides (that part is bent and fastened to the end panels). We mark the bend lines on the sheet. The sheet needs to be bent with the help of wooden sticks, otherwise we will not achieve the quality of shape we want, if we manage to bend it where we want at all. The side edges need to be snipped and bent at a right angle, and they will then be fastened to the end panels. The front and rear bends stiffen the lighting and at the same time hide the sharp edge. The bend at the rear underside of the lighting gives it better stability on the aquarium (you could still bend the end downward, which would then keep the lighting from sliding off the aquarium).
After bending the sheet (it does not have to hold the final shape perfectly) we place the end panels against it from the outside and gradually drill holes and screw both parts together. We fasten each bent face on the given side with two screws, which gives a solid, lasting joint. We space the ballasts evenly along the rear side, so that lifting the lighting by the front will not be a problem.
At the front we place the fluorescent tubes, which are fastened with cable ties to adhesive mounts (you could also drill holes in the hood and thread the cable ties through them). I put the starters between the tubes and the ballasts. Along the sides and in the corners of the lighting we run the cables.
We put the switch on the side of an end panel, preferably in a box that is at least splash-resistant. Using more than one switch gives us a way to regulate the light intensity. I like to use switches with a neon indicator. We also connect the grounding cable so that the lighting at least partly meets safety standards. We solder it to a ring terminal which we put under a screw, and that way the grounding conductor is bonded to the metal hood.
It is a good idea to glue some light-reflecting foil to the inside of the plastic end panels, but it is not necessary.
Finally I recommend covering the lighting on the outside with washable wallpaper.
Under lighting like this I successfully grow red cryptocoryne and Cryptocoryne aponogetifolia, Java fern, Anubias barteri and Java moss.
PS: On free-standing aquariums I attach to the lighting end panel an extension cord with a switch, and that switch controls the lighting.
As a simple lighting setup I then use
an inverted plastic flower pot that has a hole in the bottom with a bulb socket in it; a regular power cord with a switch provides the electrical connection.
It is quick and fairly cheap to make, the lighting is also compact, but to be economical on electricity you would want to use an "energy-saving bulb",
properly speaking a compact fluorescent lamp.
I use lighting like this on two 30-litre aquariums; a 25 W bulb is enough.
Of course it is worth making lighting with fluorescent tubes,
because they are cheaper than "energy-saving bulbs", they are more efficient than incandescent bulbs, and they light the aquarium more evenly.
Fluorescent tubes are also a better deal than "energy-saving bulbs", because at a given output they are cheaper and, above all, last longer.
PS: Do not buy energy-saving bulbs, buy fluorescent tubes, they are even more efficient!
Under this lighting I successfully grow, for example, red cryptocoryne, Cryptocoryne crispatula and Java moss, which I am happy to sell at a good price.
Articles on a similar topic
How to Grow Aquarium Plants
Aquarium Air Pump
Internal Air-Powered Foam Filter for an Aquarium
Aquaristics
Newsletter
If you are interested in receiving occasional news by email.
You can register by filling in your email
news subscription.
+